Ok so these weren't my fave. On Sunday night I didn't decide until too late, that some homemade french bread or rolls would be lovely with my homemade stew so I thought in an attempt to still get some fresh homemade bread on the table I'd try these on for size. They were moist and yummy but we found them to be rather dense and my husband and I decided they were almost more buscuit like than roll like.
So the verdict...still love the Buttermilk roll recipe I posted not too long ago, and they would definately be our top pick but at a pinch these are a possible substitute.
30 Minute Rolls
1 1/8 cups plus 2 tsp. warm water
1/3 cup oil
2 Tb yeast
1/4 cup sugar or honey
½ tsp. Salt
1 egg
3 ½ cups flour
Mix 1st 4 ingredients and let rest for 15 minutes. Add salt and eggs - gradually add flour. Shape into dinner rolls, or use in your favorite recipe that calls for dough. After shaped, let rest for 10 minutes. For rolls, melt a little butter and brush the tops of the rolls and bake 10 minutes @400 degrees till golden brown.
Tuesday, November 30, 2010
Saturday, November 27, 2010
Birthday
A couple of weeks ago I celebrated my 29th birthday. I wasn't much in the mood for celebrating this year but my sweet husband did a wonderful job of trying to lift my spirits and make my day special. Gabe was especially cute also and kept telling me all day that he would buy me some ice cream and some tractors for my birthday if I wanted him too. As is the case on any other day, being with Gabe was the greatest gift of all. On the other hand Brad did an awesome job of spoiling me and showering me with nice things. Oh how I love my sweet Brad!
It's hard to believe that next year I will be 30. This next year, among other things I'm going to work on being ok with the fact that I will no longer be in my 20's anymore. ***sigh*** One year older and uglier.
Wednesday, November 24, 2010
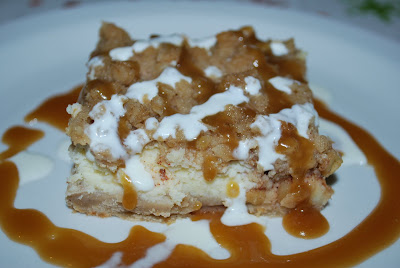
Caramel Apple Cheesecake Bars with Streusel Topping
I think the name and the pictures speak for themselves on this one.
Ever been in a room listening to a beautiful live musical performance piece and when the performer gets done no one dares even a whisper because they don't want to disturb or diflect from the feeling of awe and wonder. Meet...
Caramel Apple Cheesecake Bars with Streusel Topping
Melskitchencafe.blogspot.com
Serious? Oh yes I am...No you're not dreaming...come on...a little closer
A little closer now
Drooling yet? You should be! Try and only eat one serving. I double dare you!
Base:
2 cups all-purpose flour
1/2 cup firmly packed brown sugar
¼ teaspoon salt
½ teaspoon cinnamon
1 cup (2 sticks) butter, softened
Cream Cheese Layer:
2 (8-ounce) packages cream cheese, softened
1/2 cup sugar
2 large eggs
1 teaspoon vanilla extract
Apples:
3 Granny Smith apples, peeled, cored and finely chopped
2 tablespoons sugar
1/2 teaspoon ground cinnamon
1/4 teaspoon ground nutmeg
Streusel Topping:
1 cup firmly packed light brown sugar
1 cup all-purpose flour
½ teaspoon cinnamon
1/2 cup quick cooking oats
1/2 cup (1 stick) butter, softened
1 cup caramel sauce (homemade recipe below)
Preheat oven to 350 degrees F.
In a small bowl, stir together chopped apples, two tablespoons sugar, cinnamon, and nutmeg. Set aside.
In a medium bowl, combine all the streusel topping ingredients and mix until crumbly. Set aside.
In a medium bowl, combine flour and brown sugar. Cut in butter with a pastry blender or two forks until mixture is crumbly but combined. Press evenly into a 9X13-inch baking pan lined with aluminum foil. Bake for 10 minutes or until lightly browned.
While the crust is baking, in a large bowl, beat cream cheese with 1/2 cup sugar until smooth. Then add eggs, one at a time and then the vanilla. Mix well. Pour over the warm crust.
Spoon the apple mixture evenly over the cheesecake layer. Sprinkle the streusel topping over the apples. Bake for 30 minutes until the filling is set.
Cool the bars to room temperature. Drizzle with the caramel topping (or plate individual slices and drizzle with topping one by one).
Caramel Sauce:
4 tablespoons butter
1 cup firmly packed light brown sugar
½ cups half-and-half or cream
Pinch of salt
1 tablespoon vanilla
Mix butter, brown sugar, half-and-half or cream, and salt in a saucepan over medium-low heat. Bring the mixture to a simmer and cook while whisking gently for 5 to 7 minutes, until thickened slightly. Add the vanilla and cook another minute to thicken further. Turn off the heat and pour the sauce into a jar. Refrigerate until cold. If the caramel sauce has cooled in the fridge long enough to harden, warm slightly before drizzling on bars.
Monday, November 15, 2010
Roasted Garlic and Cauliflower Pasta
You know how when were a kid you hated some vegies, but now that you are an adult you are finding that some of those rotten old vegies are actually pretty tasty? Meet Cauliflower. If you had of tried to feed this to me before the age of...probably 25 I would have said..."um thanks...but no thanks". I used to be the same way about broccoli, but then...I discovered a wonderful thing called cheese sauce. Slowly but surely as long as it was covered with cheese sauce I would eat my broccoli and my cauliflower. This past September I went to a new restaurant called Zupas and had THE best cauliflower soup. That soup has sparked in me a desire to get to know cauliflower a little better.
This pasta was AWESOME! I loved this new take on your typical pasta covered in some kind of sauce. It was full of flavor and simply...well awesome. I did however add some seasoned grilled chicken to mine to make it more kid and husband friendly. I have been wanting it ever since the day I made it a few weeks ago. This will certainly be on our table again soon! YUMMO!
Roasted Garlic and Cauliflower Pasta
www.melskitchencafe.com
*Serves 4-6
2 heads garlic, papery skins removed, top quarter of heads cut off (on the pointy side of the garlic) and discarded
6 tablespoons plus 1 teaspoon extra-virgin olive oil
1 head cauliflower (about 1 1/2 pounds)
1 teaspoon salt
1/4 teaspoon pepper
1/4 teaspoon sugar
1 pound short pasta (such as fusilli, rotini or campanelle)
1/4 teaspoon red pepper flakes
2 – 3 tablespoons juice from 1 lemon
1 tablespoon fresh parsley leaves, chopped
2 ounces Parmesan cheese, grated or shredded (about 1 cup)
1/4 cup chopped walnuts, toasted (I'm not a fan of walnuts but I LOVE cashews so I substituted cashews here.)
Adjust an oven rack to the middle position, place a large rimmed baking sheet on the rack, and heat the oven to 450 degrees.
Cut one 12-inch sheet of foil and spread it flat on the counter. Place the garlic heads, cut-side up, in the center of the foil. Drizzle ½ teaspoon olive oil over each head and fold up the sides of the foil to seal well. Place the foil packet directly on the oven rack (not on the preheating baking sheet) and roast until the garlic is very tender, about 40 minutes. Remove the foil packet from the oven, open the foil and set it aside to cool.
While the garlic is roasting, trim the outer leaves of the cauliflower and cut the stem flush with the bottom. Cut the head from pole to pole into 8 equal wedges and then cut the cauliflower into large bite-sized pieces. Place the cauliflower in a large bowl; toss with 2 tablespoons oil, salt, pepper, and sugar.
Remove the hot baking sheet from the oven. Carefully transfer the cauliflower to the baking sheet and spread into an even layer. Return the baking sheet to the oven and roast until the cauliflower is well browned and tender, 15 to 20 minutes
While the cauliflower roasts, bring 4 quarts of water to a boil in a large pot. Add 1 tablespoon salt and pasta; cook until al dente. Squeeze the cooled, roasted garlic cloves from their skins into a small bowl. Using a fork, mash the garlic to a smooth paste, then stir in red pepper flakes and 2 tablespoons lemon juice. Slowly whisk in remaining 1/4 cup oil.
Drain the pasta, reserving 1 cup cooking water, and return the pasta to the pot. Add the chopped cauliflower to the pasta; stir in the garlic sauce, ¼ cup cooking water, parsley, and ½ cup cheese. Adjust the consistency of the pasta with additional cooking water and season with salt, pepper, and additional lemon juice to taste. Serve immediately, sprinkling with remaining ½ cup cheese and toasted nuts.
Recipe Source: adapted slightly from Cook’s Illustrated
Wednesday, November 10, 2010
Pretty Darn Incredible
Today is my most favorite day of the year. Not Christmas, Thanksgiving, my birthday, a wedding anniversary or any of those...just today...November 10th.
On this day, three years ago, the stork literally showed up and dropped off our sweet angel Gabriel. Though we look nothing alike physcially, I seldom even think about the fact that we adopted Gabe. He is ours. He always has been and was always supposed to be our little boy. It is however, fun on this day to reflect back on the events of our first November 10th together and all that has since transpired. We always make it a point to celebrate this day by doing something special. Tonight we are going to take Gabe to his most favorite restaurant for dinner- Costa Vida and then go-carting at Boondocks.
Gabe is his daddy to a tee in a little tan body with awesome curly and crazy dark hair. But most importantly, he is the sweetest, smartest, spunkiest and most beautiful little boy in the world. Brad and I love this little guy more than we could ever express in words. I feel lucky every day (even if he is being rotten) that I get to be his Mummy. He thinks far beyond himself and his little 3 years and makes me laugh all day long with his crazy made up stories and the cute things he says. Just yesterday we were leaving the gym and he said:
Gabe- "Mamma I am so proud of you"
Me- "Oh Gabe, that is a nice thing to say...why are you proud of me?"
Gabe- "Because you workout at the gym so you can be healthy and strong"
I love that he wakes me up every morning by lying on-top of me, kissing me and rubbing my face. I love that he tells me that he will help Daddy protect me from the bad guys. I love how thoughtful he is and how he seems concerned about everyone in his life. I love how when he knows I'm sad he sits on my knee, gets right in my face less than an inch from me and says..."Mamma I'll draw you a pitchka" and then he hugs and kisses me till I promise him I'm ok.
Our Gabe is pretty darn incredible alright!
Look out bad guys...see how mean I am?!
Gabe was the brunette version of Dash from the Incredibles this year. This was his choice. I asked him what he wanted to be for Halloween and he said Dash. That was that. It is fun to have him put the costume on and then hear him say "Want to watch me run Mamma?" Then he proceeds to run around the room and of course I gush and tell him he can run faster than anyone I've ever seen.
We love you Gabe....everyone who knows you loves you!!
Monday, November 8, 2010
Tribute to the Triplets
Last Monday was a crazy day. From the second I woke up, I was flat out working on making 3 baby blankets and 6 personalized onsies for my sweet friend Erin's baby shower I was to attend later that evening. I had so much fun planning their gifts and making them, knowing that those handsome little boys would be warm and snugly in my blankets and styling in their onsies made me so happy.
After years of trying unsuccessfully to get pregnant, months trying fertility drugs and a number of failed attempts with artificial insemination my friend was FINALLY Pregnant thanks to IVF with identical triplet boys due some time late December early January. These boys were the answer to many many prayers and all who know and love Erin and Wade were thrilled for them.
The baby shower was lovely. Lovely home, cute decorations, delicious food, lots of friends and lots of gifts. I was excited and proud to present my gifts to Erin.
This afternoon, however, I received word that Erin had lost her sweet boys. They came too soon and left too quickly. They were here but a moment but will be loved forever. My heart is full of sadness for my sweet friend and her family. As is always the case, it doesn't seem fair, it isn't fair and it happens to the neatest people who have already endured so much. Though my anguish feels at the forefront, I know that Erin and her husband will see and raise those baby boys someday. Until then, they have three very special little guardian angels watching over them and waiting for the day when they will be reunited. I am so grateful for the knowledge I have of eternal families and so grateful for the comforter who guides us through these difficult times.
Peach Crumble Pie
This past Saturday night our ward had their annual pie night. We didn't go this year because Brad was literally knee deep in dirt in our laundry room working on putting in a new laundry room floor. On Halloween Eve after working a 10 hour day I came home to this...uh oh!
YUP!...that is the outside view of my laundry room which has been completed gutted and we are in the process of re-building. YIKES!
Notice how dark it is and we STILL don't have a wall in...I was getting nervous
Thankfully our awesome neighbor Shane came over later that night to help Brad get the new wall put in.
Brad working on the floor...We still have a ways to go but thankfully I now have a make-shift plywood floor and can use my washer and dryer. I hate it while it's being done, but can't wait to see the finished result. It will be so nice! I am also extremely grateful to have such a hard working and talented husband who can and is willing to do all the work on our little old house. With Brad there is no such thing as my leg hurts, I'm tired, it's too hot, cold or wet, it's too heavy etc. He is a mans man and I am so grateful. No wimps in this house!
Back to the pie...Brad loves pie. We really could care less that we missed out on socialising with people in our ward, but Brad did miss the pie. On Sunday he turned to me with puppy dog eyes and said..."I want pie." So once we were home from church, everyone was fed lunch and Gabe was down for a nap...I got busy. With not much pie making fruit in the house, I decided to use the last two quarts of peaches I canned this summer (sniff sniff). The result...Nat's Peach Crumble Pie= one happy Nat AND one very happy and satisfied husband. Love you babe!!
I made two pies so if you are wanting to make just one you will need to half the amounts of crumb topping and peach filling. But since you are going to the effort of making one...go on and make another and take it to a friend or neighbor!
Peach Crumble Pie
Easy Pat-in-the-Pan Pie Dough
America's Test Kitchen
Makes one 9-inch pie shell
1 1/4 c unbleached all-purpose flour
2 T sugar
1/4 t salt
8 T (1 stick) unsalted butter, softened but still cool
2 oz. cream cheese, softened but still cool
Lightly coat a 9-inch pie plate with vegetable oil spray.
Whisk flour, sugar, and salt in a medium bowl.
Beat butter and cream cheese with an electric mixer on medium speed until combined, about 2 minutes, scraping down sides of bowl as needed. Add flour mixture and beat on medium-low until mixture resembles coarse cornmeal, about 20 seconds. Scrape down sides of bowl and increase speed to medium-high until dough begins to form large clumps, about 30 seconds. Reserve 3 T of the dough and set aside.
Turn remaining dough out onto a lightly floured counter, gather into a ball, and flatten into a 6-inch disk. Transfer to pie plate and press the dough evenly over the bottom of the plate towards the sides, using the heel of your hand. With fingertips, work dough up the sides until evenly distributed.
Roll reserved 3 tablespoons into ropes, press onto edges of crust and form a fluted edge. Wrap in plastic wrap and refrigerate for at least one hour. (I put mine in the freezer for 30 minutes)
Peach Filling
6 cups of roughly chopped canned peaches (reserve about 1/3 cup of the juice)
1 cup brown sugar
1/4 to 1/3 cup of the reserved peach juice depending on how juicy your peaches are
4 tbls spoons of lemon juice
1/4 cup cornstarch
1/4 tsp salt
2 tsps vanilla extract
Combine all ingrediants in a bowl and once combined pour into the prepared pie dish.
Crumb Topping
2 cups all purpose flour
1/2 cup sugar
8 tsp cup packed dark brown sugar
3/4 teaspoons baking powder
1/4 teaspoon salt
10 tablespoons cold, unsalted butter cut into chunks
1 large egg
In the bowl of a stand mixer with a paddle attachment stir together the flour, sugar, brown sugar, baking powder, and salt. On low speed, add the butter chunks and beat until the mixture is very crumbly and the butter is cut in. You can do all this by hand if you prefer using your fingertips or a pastry blender to run the butter into the flour until the mixture is crumbly with the largest chunks about pea-sized. Add the egg on low speed (or use a fork) until the mixture is crumbly and combined and when squeezed just holds together.
Using your hands sprinkle the crumb topping on top of the pie mix squeezing some of the mixture to make larger crumbs.
Bake at 375 for 40-45 minutes or until the pie is starting to look golden on top. ENJOY!
YUP!...that is the outside view of my laundry room which has been completed gutted and we are in the process of re-building. YIKES!
Notice how dark it is and we STILL don't have a wall in...I was getting nervous
Thankfully our awesome neighbor Shane came over later that night to help Brad get the new wall put in.
Brad working on the floor...We still have a ways to go but thankfully I now have a make-shift plywood floor and can use my washer and dryer. I hate it while it's being done, but can't wait to see the finished result. It will be so nice! I am also extremely grateful to have such a hard working and talented husband who can and is willing to do all the work on our little old house. With Brad there is no such thing as my leg hurts, I'm tired, it's too hot, cold or wet, it's too heavy etc. He is a mans man and I am so grateful. No wimps in this house!
Back to the pie...Brad loves pie. We really could care less that we missed out on socialising with people in our ward, but Brad did miss the pie. On Sunday he turned to me with puppy dog eyes and said..."I want pie." So once we were home from church, everyone was fed lunch and Gabe was down for a nap...I got busy. With not much pie making fruit in the house, I decided to use the last two quarts of peaches I canned this summer (sniff sniff). The result...Nat's Peach Crumble Pie= one happy Nat AND one very happy and satisfied husband. Love you babe!!
I made two pies so if you are wanting to make just one you will need to half the amounts of crumb topping and peach filling. But since you are going to the effort of making one...go on and make another and take it to a friend or neighbor!
Peach Crumble Pie
Easy Pat-in-the-Pan Pie Dough
America's Test Kitchen
Makes one 9-inch pie shell
1 1/4 c unbleached all-purpose flour
2 T sugar
1/4 t salt
8 T (1 stick) unsalted butter, softened but still cool
2 oz. cream cheese, softened but still cool
Lightly coat a 9-inch pie plate with vegetable oil spray.
Whisk flour, sugar, and salt in a medium bowl.
Beat butter and cream cheese with an electric mixer on medium speed until combined, about 2 minutes, scraping down sides of bowl as needed. Add flour mixture and beat on medium-low until mixture resembles coarse cornmeal, about 20 seconds. Scrape down sides of bowl and increase speed to medium-high until dough begins to form large clumps, about 30 seconds. Reserve 3 T of the dough and set aside.
Turn remaining dough out onto a lightly floured counter, gather into a ball, and flatten into a 6-inch disk. Transfer to pie plate and press the dough evenly over the bottom of the plate towards the sides, using the heel of your hand. With fingertips, work dough up the sides until evenly distributed.
Roll reserved 3 tablespoons into ropes, press onto edges of crust and form a fluted edge. Wrap in plastic wrap and refrigerate for at least one hour. (I put mine in the freezer for 30 minutes)
Peach Filling
6 cups of roughly chopped canned peaches (reserve about 1/3 cup of the juice)
1 cup brown sugar
1/4 to 1/3 cup of the reserved peach juice depending on how juicy your peaches are
4 tbls spoons of lemon juice
1/4 cup cornstarch
1/4 tsp salt
2 tsps vanilla extract
Combine all ingrediants in a bowl and once combined pour into the prepared pie dish.
Crumb Topping
2 cups all purpose flour
1/2 cup sugar
8 tsp cup packed dark brown sugar
3/4 teaspoons baking powder
1/4 teaspoon salt
10 tablespoons cold, unsalted butter cut into chunks
1 large egg
In the bowl of a stand mixer with a paddle attachment stir together the flour, sugar, brown sugar, baking powder, and salt. On low speed, add the butter chunks and beat until the mixture is very crumbly and the butter is cut in. You can do all this by hand if you prefer using your fingertips or a pastry blender to run the butter into the flour until the mixture is crumbly with the largest chunks about pea-sized. Add the egg on low speed (or use a fork) until the mixture is crumbly and combined and when squeezed just holds together.
Using your hands sprinkle the crumb topping on top of the pie mix squeezing some of the mixture to make larger crumbs.
Bake at 375 for 40-45 minutes or until the pie is starting to look golden on top. ENJOY!
Saturday, November 6, 2010
Crockpot Lasagna
I love love love Italian Food. Maybe it's the small amount of Italian blood in my veins...maybe not. However, it is my fave by a mile. My favorite Italian restaurant is Biaggis at the Gateway. Oh how I love that place. I love lasagna too but my version, though worth it, is time consuming. So when I saw them making this quick, easy and healthy version on Oprah I was SO in.
This was fast and easy to throw together and very tasty. If I get a hankering for lasagna again and don't have the time and or energy as I've felt lately this will likely be my go to recipe. I was also interested to learn that funny man Jerry Seinfeld had a wife who had a recipe book out. Never knew that.
I love how this recipe sneaks in a substantial amount of spinach that is virtually undetectable. My husband is not a fan of spinach and I was a little worried that my son might spot it and be scared off, but they both enjoyed this recipe and nobody complained about the "green stuff" in it! AWESOME!!
My picture isn't too lovely but trust me don't let that put you off!
Crockpot Lasagna
Jessica Seinfeld
Servings: Serves 6-8 (generous portions)
Ingredients
3 cans (14.4 ounces) crushed tomatoes
3 cloves garlic , finely chopped
2 Tbsp. dried oregano
1/2 tsp. kosher salt
1/4 tsp. red pepper flakes
1/4 tsp. freshly ground black pepper
2 containers (15 ounces each) fresh ricotta
2 cups (8 ounces) grated mozzarella
1/4 cup grated Parmesan
12 lasagna noodles (about three-quarters of a 1-pound box)
5 ounces (about 6 cups) baby spinach
Directions
In a medium bowl, combine the tomatoes, garlic, oregano, salt, red pepper and black pepper. In a separate bowl, mix the ricotta, 1 cup of the mozzarella and Parmesan.
In the bottom of a 5- to 6-quart slow cooker, spread a thin layer of the sauce. Top with 3 of the noodles (breaking to fit as necessary). Spread about 1 cup of the sauce over the noodles and layer with 2 cups of the spinach and 1 1/2 cups of the cheese mixture. Repeat twice more with the noodles, sauce, spinach and cheese mixture. Top with the remaining 3 noodles, sauce and 1 cup mozzarella.
Cook on low, covered, until the noodles are tender—especially in the center of the lasagna—about 3 to 3 1/2 hours.
Friday, November 5, 2010
Chicken and Wild Rice Casserole
When I was planning my fortnightly menu earlier this week I went to the Better Homes and Gardens website for a little inspiration. This recipe sounded good to me from the get go. Hot creamy rice with chicken and vegies?! I mean c'mon...you can't go wrong.
We all LOVED this. Even my sick and fussy lately three year old loved it and gobbled it up. If he loves something as soon as he puts it in his mouth he will rub his tummy, say "mmmmm" and then proceed to tell me it is yummy in his tummy. The second night when we ate the left overs for dinner he said "This is really good mama." I was happy!
I did make some small modifications to it (see below) based on what I had in my pantry but I have no cause for complaint. The texture and this may be because I didn't use the wild rice was allot like a risotto. Again...I'm not complaining. =)
I couldn't seem to get a "pretty" picture of this dish and frankly I was so excited to dig in, I didn't even care. This will definitely make an appearance on our dinner table again. I'm craving it now!
Chicken and Wild Rice Casserole
Better Homes and Gardens
Ingredients
1 6-ounce package long grain and wild rice mix (I used plain rice because I had it on hand)
1 medium onion, chopped (1/2 cup)
1 stalk celery, chopped (1/2 cup)
2 tablespoons butter
1 10.5- or 10.75-ounce can condensed chicken with white and wild rice soup or cream of chicken soup (I used Cream of chicken)
1/2 cup sour cream
1/3 cup dry white wine or chicken broth (I used chicken broth)
2 tablespoons snipped fresh basil or 1/2 teaspoon dried basil, crushed (I used dry)
2 cups shredded cooked chicken or turkey (I used a left over rotisserie chicken I had in the fridge)
1/3 cup finely shredded Parmesan cheese
Directions
1. Prepare rice mix according to package directions.
2. Meanwhile, preheat oven to 350 degrees F. In a large skillet, cook onion and celery in hot butter over medium heat until tender. Stir in soup, sour cream, wine, and basil. Stir in cooked rice and chicken.
3. Transfer mixture to an ungreased 2-quart baking dish. Sprinkle with cheese. Bake, uncovered, about 35 minutes or until heated through. Makes 4 servings.
Thursday, November 4, 2010
and I don't even LIKE peanut butter!
Ok call me crazy but I am not a fan of peanut butter. I don't like Reeses Peanut butter cups, Butterfingers, peanut butter crackers, peanut butter bars or peanut butter on celery. Nope just not a fan. However, after making and consuming far too many of these little dears I can now say that I really do enjoy a GOOD peanut butter chocolate chip cookie. I was surprised myself, but hey, pleasantly so.
One thing I did add to this recipe, was add a handful of butterscotch chips in with my chocolate chips. I did this for no other reason than I had a handful left in a bag I was trying to use up. I was really surprised at how great the butterscotch flavor blended with the peanut butter flavor. It seems like an unlikely combo but the next time I make these I think I will do half and half...I liked it that much.
My little guy doesn't have the biggest sweet tooth. He doesn't usually ask for candy, he will leave most desserts, rarely finishes a dum dum and he isn't even a big fan of fruit snacks but he does love his cookies. I was recently at the store with him and he saw some cookies and started asking for them. Aside from the fact that I thought the price was a little steep for something I could make myself and I knew that they would likely be loaded with all sorts of preservatives etc we opted for a bag of chocolate chips instead and went home to have some fun together in the kitchen. The results were one happy toddler, a happy mummy and some happy neighbor kids. Anytime we make a treat Gabe is always sure to set some aside for the cute neighbor kids one house over and especially his girlfriend Emma.
Mel suggests popping baked and cooled cookies into the freezer (in a large Tupperware or freezer-safe Ziploc bag). I had never done this before but thought I'd try in case my little guy needed a cookie fix and I didn't have time to make some. I was pleasantly surprised that they were just as awesome pulled out of the freezer and left to thaw as the day I pulled them out of the oven. I'll be doing this allot more in the future.
Peanut Butter Chocolate Chip Cookies
www.melskitchencafe.com
*Makes about 4-5 dozen
1 cup (16 tablespoons) butter, softened to room temperature
2 cups smooth or chunky peanut butter
1 ½ cups firmly packed light brown sugar
1 cup granulated sugar
2 large eggs
1 ½ tablespoons milk
1 ½ teaspoons pure vanilla extract
2 ½ cups all-purpose flour
1 ½ teaspoons baking soda
1 teaspoon baking powder
½ teaspoon salt
2 cups chocolate chips (or a combination of peanut butter and chocolate chips or whatever tickles your fancy)
Preheat the oven to 350 degrees.
In a large bowl combine the butter and peanut butter and beat the mixture until it is light and fluffy (you can do this with a hand mixer or with an electric mixer fitted with the paddle attachment). Add the brown and white sugars and mix until well combined. Add the eggs and mix for 1-2 minutes, until the mixture is well combined and light in color. Add the milk and vanilla and mix. Add the dry ingredients and mix just briefly. While there are still large spots of flour, add the chocolate chips (or peanut butter chips or both) and mix until the flour is completely mixed in and the mixture is well combined. Let the cookie dough sit for 15 minutes before scooping onto the baking sheets. It will firm up as it sits.
When ready to bake, scoop tablespoon-sized balls of dough onto silpat or parchment-lined baking sheets leaving about 1 to 2 inches in between the cookies to allow for spreading as they bake. Bake for 10-11 minutes, taking care not to over bake in the slightest! Leave the cookies on the baking sheet for 2-3 minutes after baking before removing them to a cooling rack. This will help them set up and be firm enough to transfer without having them over bake in the oven. The cookies may look slightly under baked but they will firm up as they cool. Resist the urge to eat them warm as they taste much better cooled.
Wednesday, November 3, 2010
Peach Cinnamon Vanilla Crumb Bars
I know I've said it before but I love peach desserts and treats. I also love anything with a graham cracker crust or a crumb topping of some kind. There is just something about the oh so naughty butter, sugar, flour combination that gets me every time. When Holly over at phemomenon.blogspot.com posted this recipe, peaches were right in season and thanks to my in-laws peach tree I had an abudance of them in my home. I was so excited to try this recipe for two reasons. 1.- It had my favorite crumb and peach elements and 2.- Holly NEVER disapoints! =)
These were fantastic. Sadly I didn't get a picture of them because I had made them to take away on a family vacation with us. Last month we were lucky enough to spend a blissful week up in Park City at the Westgate resort with my Dad, his wife and the extended family. The Westgate Resort is one of my favorite places on earth and when I am there, I am in heaven. We ate, we swam, we shopped, we played, we visited and I enjoyed LONG LONG LONG european steam showers (twice a day). MMMMMMMMMM. Needless to say whilst there I wasn't so concerned with taking a picture of what I was eating as I was just getting down to business and eating it. So I pinched this picture from Holly's fabulous and famous food blog. Go check it out!!
This recipe was my first introduction to the cinnamon, vanilla, peach combination. All I can say is it is a match truly made in heaven!
Peach Cinnamon Vanilla Crumb Bars
phemomenon.blogspot.com
For the peach vanilla cinnamon filling:6 cups peeled, chopped fresh peaches (about 7 peaches)
1/2 cup sugar
1 vanilla bean, split lengthwise and seeds scraped out
1 teaspoon ground cinnamon
3 tablespoons cornstarch (optional)
For the crust and crumbs:4 cups all purpose flour
1 cup sugar
1/3 cup packed dark brown sugar
1 1/2 teaspoons baking powder
1/2 teaspoon salt
2 1/2 sticks (20 tablespoons or 1 1/4 cups) cold, unsalted butter cut into chunks
1 large egg
Make the peach filling first: In a large pan, stir together the chopped peaches, sugar, the vanilla bean seeds and the split bean pod, and the cinnamon. Stir well to combine and bring to a boil over medium heat. Turn the heat down and allow to simmer about 30 minutes until the juices have mostly thickened. You can stop at this point with a little juice, or if you like a thicker filling, stir in the cornstarch and simmer for 2 minutes more until the peach filling is thick. Remove the filling from the heat and allow to cool to about room temperature.
(Note: This peach filling is also wonderful in crepes or on pancakes or waffles.)
Preheat the oven to 375 degrees F. Lightly spray a 9x13-inch baking pan and line it with a piece of parchment so that the parchment makes a sling in the pan with the edges hanging up and out the long sides of the pan. Crease the parchment into the bottom corner of the pan to help keep it in place. Spray the parchment lightly to make sure everything is well greased. Set the pan aside.
In the bowl of a stand mixer with a paddle attachment stir together the flour, sugar, brown sugar, baking powder, and salt. On low speed, add the butter chunks and beat until the mixture is very crumbly and the butter is cut in. You can do all this by hand if you prefer using your fingertips or a pastry blender to run the butter into the flour until the mixture is crumbly with the largest chunks about pea-sized. Add the egg on low speed (or use a fork) until the mixture is crumbly and combined and when squeezed just holds together.
Press about half of the dough mixture into the bottom of the greased pan evenly and pressing into the corners and edges (do not go up the sides of the pan).
Spread the mostly cooled peach filling evenly over the crust in the pan. Squeeze the remaining crumbs in the bowl lightly to just make bigger crumbs and chunks and scatter that crust over the peach filling.
Bake the bars for 40 to 45 minutes or until the top is light golden brown. Remove the pan from the oven and allow to cool completely in the pan. Use the parchment sling to remove the entire bar from the pan and onto a cutting board. Use a sharp knife to cut into squares or rectangles (makes about 24 to 30 bars depending on how big or small you cut them).
Tuesday, November 2, 2010
Apple Brownies
I was watching one of my favorite shows on Create the other day- The Katie Brown Workshop and she made these brownies. Just the name alone had me interested. When I hear brownies, I automatically think of cocoa and chocolate. I served these with a little whipped cream and they were delicious. Even my husband who is not a fan of apple anything deserts enjoyed these.
Apple Brownies
Katie Brown
Makes one 13" x 9" pan
Ingredients
3 eggs
1 ¾ cups sugar
1 cups vegetable oil
1 teaspoons vanilla
2 cups all purpose flour
1 teaspoons cinnamon
1 teaspoons baking powder
½ teaspoon salt
2 cups diced apples
1. Preheat oven to 350 degrees.
2. In a large mixing bowl beat eggs and sugar until fluffy and pale. Add oil and vanilla; mix well. Sift dry ingredients and mix into the wet mixture. Stir in apples.
3. Coat pans with non-stick spray and spread batter evenly into pan. Bake for 45-50 minutes or until a toothpick inserted into the center comes out clean.
Monday, November 1, 2010
Homemade Ranch Dressing
I don't like salad but I do LOVE homemade ranch. I'll admit it. The only time I am really down for eating a salad is if I have some homemade ranch on hand. I know it's bad and I know it's weird especially to most Americans, but Australians don't eat salad like the Americans do. When I first came to the states it absolutely blew my mind that people of all ages including little kids liked and ate salad on a regular basis. At restaurants in Australia you don't get a salad with your meal...that is something you would have to request all on your own. So when I first moved here I thought it so strange that everywhere you went it was a given, the norm, that they would try (in my case) and feed you salad.
I got this recipe from my sister in law Liz and it is wonderful on salads and also used as a dipping sauce for whatever your heart may desire. =)
Homemade Ranch Dressing
Liz Bentley
Between 1 and 1 1/2 cups of buttermilk
2 cups of mayonaise
1 8 ounce package of cream cheese softened
1 tsp of accent (found in most grocery stores in the spice section by the salt)
1 tsp black pepper
1 tsp onion salt
1 tsp garlic salt
Place all the ingrediants in a blender and mix until smooth. You can also place all the ingrediants in a bowl and use a handheld mixer if you don't have a blender. This will make a whole blender full. The dressing should stay good for about as long as the buttermilk is good.
Enjoy!
Subscribe to:
Posts (Atom)