Gabe has been excited for Halloween for literally 6 months. Every day he would tell me what he was going to be (usually something different everyday) and what I could be and what Brad could be (again something different every day). I was getting nervous with all of his indecisiveness about a costume until a week before Halloween when he finally decided that this year he wanted to be the black Spiderman aka Venom.
We ordered his costume online and everyday he waited and waited with great anticipation for it to arrive in the mail. Once it did arrive, he didn't have to be wearing it constantly but he did like to take it with us pretty much everywhere we went and he always had to have it in his backpack when he went to school.
We went to the annual trick or treating extravaganza at Brad's office on the Thursday before Halloween. Then we went to our ward trunk or treat on the Saturday night and then finally on Halloween day Gabe got to go to a Halloween party at Brad's Uncle Terry and Aunty Cerena's house. On Halloween night, he had a blast answering the door and handing out the candy to all the kids who came by. The door bell would ring and he would sprint from the back of the house to the front to open the door. Brad and I were forbidden from answering the door all night.
He had a blast this year and is already planning for Halloween next year.
We just love our little Spiderman.
When we first got to Brad's office he was being a little coy...just like Mum and Dad he doesn't like all the attention
Warming up
There we go
Brad's whole office really goes all out for Halloween...it's pretty neat.
The upper management of the company were all dressed as Garden gnomes.
Gabe and his little friend Jaxon who is 3 months YOUNGER than Gabe. This photo cracks me up. Jaxon is SO huge. Brad and Jaxon's Daddy John carpool together.
We also had my niece Payton (Jarom's baby) with us. She wasn't too sure about allot of the costumes and decorations but she is always happy if uncle Brad is holding her.
The little Lion
Look at those eyes. She is a cutie just like her Daddy!
Tuesday, November 1, 2011
Wednesday, October 26, 2011
This face...
Tuesday, October 25, 2011
Strawberry Shortcake French Toast
I think I've said before that my Brad loves french toast and I love pancakes. On conference weekend (Sunday) Brad had to leave shortly after breakfast to fly out for a business trip back East. I wanted to send him off with a delicious homemade breakfast and so decided to give this recipe a try. We both enjoyed it and so did my neighbors who benefited from the extras we had. The best part, I felt like I had given him a slightly fancier version of his favorite which is what I was aiming for. He left with a happy and full tummy and I was satisfied.
Strawberry Shortcake French Toast
Foodnetwork.com
Directions
Mix 1 teaspoon grated lemon zest with 3 tablespoons sugar; toss about a third of the lemon-sugar with 3 cups halved strawberries. Make the egg mixture for Perfect French Toast (see below); add 4 split English muffins and soak, 5 minutes, then fry and bake as directed. Sandwich some strawberries and more lemon-sugar between the muffin halves. Top with yogurt, more berries and a drizzle of honey.
Perfect French Toast
Preheat the oven to 350 degrees F. Whisk 4 eggs, 1 1/2 cups half-and-half or milk, 1/2 teaspoon nutmeg, 1 teaspoon vanilla extract, 1 teaspoon sugar and a pinch of salt in a shallow bowl. Heat 1/2 tablespoon butter in a nonstick skillet over medium heat. Working in batches, dip 6 thick slices white bread, challah or brioche (I used English muffins) in the egg mixture and cook in the skillet until golden, 2 to 3 minutes per side, adding more butter as needed. Transfer to a baking sheet and bake until puffed, 8 to 10 minutes. Meanwhile, melt 4 tablespoons butter in the same skillet until browned, about 5 minutes. Drizzle the French toast with the browned butter and maple syrup.
and a plate for the neighbors
Sunday, October 23, 2011
BEST Blueberry Muffins
Ah blueberries. They have never been my fave. I have always found this small berry to be mushy, flavorless and the skins too tough for my liking. However, one Saturday many Saturdays ago I was sitting watching my FAVORITE cooking show on KBYU - America's Test Kitchen and they were making these muffins. While I don't LOVE blueberries I do LOVE me a good muffin. Maybe I was extra hungry that day, I don't know, but I just knew I had to give these a try. I had had blueberry muffins in the past which left me feeling blah. I wanted to change my attitude about blueberry muffins and knew that if anyone could do it, it was the folks at America's Test Kitchen. As always they did not disappoint. These beauties were wonderful. Great texture and great blueberry flavor and the lemon sugar topping adds an extra unexpected wow factor. My faith in blueberry muffins has been restored and this recipe now has a permanent home in my heart!
Best Blueberry Muffins
America’s Test Kitchen
For the Lemon-Sugar Topping
1/3 cup (2 1/3 ounces) sugar [I recommend sanding sugar]
1 1/2 tsps finely grated zest from 1 lemon
For the Muffins
2 cups (approximately 10 ounces) fresh blueberries, picked over, with stems and bad blueberries thrown out
1 1/8 cups (8 ounces) plus 1 tsp sugar
2 1/2 cups (12 1/2 ounces) unbleached all-purpose flour
2 1/2 tsps baking powder
1 tsp table salt
2 large eggs
4 Tbsps (1/2 stick) unsalted butter, melted and cooled slightly
1/4 cup vegetable oil
1 cup buttermilk
1 1/2 tsps vanilla extract
Directions
For the Topping
Stir together the sanding sugar and lemon zest in a small bowl until combined. Set aside.
1. Adjust the oven rack to upper-middle position, and preheat the oven to 425 degrees F. Spray a standard muffin tin with non-stick cooking spray.
2. Bring 1 cup blueberries and 1 tsp sugar to a simmer over medium heat. Cook, mashing berries with a spoon (I find a fork works very well, maybe even better) several times, and stirring frequently, until the berries have broken down and the mixture has thickened and reduced to 1/4 cup (you will just have to eyeball this measurement), approximately 6 minutes. Transfer the mixture to a small bowl, and let cool to room temperature, 10 to 15 minutes.
3. Whisk together flour, baking powder, and salt in a large bowl. Set aside.
4. Whisk remaining 1 1/8 cups of sugar and the eggs together in a medium bowl, until thick and incorporated, about 45 seconds.
5. Slowly whisk in the butter and oil until combined. Whisk in the buttermilk and vanilla until combined.
6. Using a rubber spatula, fold the egg mixture and the remaining cup of blueberries into the flour mixture until just moistened. The batter will be very lumpy with few spots of dry flour. Do not over mix the batter, or your muffins will be tough.
7. Use an ice cream scoop or large spoon to divide the batter equally among the muffin cups. The batter should completely fill the cups and mound slightly. You should have enough batter for exactly 12 muffins.
8. Spoon a teaspoon of the cooked blueberry mixture into the center of each mound of muffin batter. Using a chopstick or a skewer, gently swirl the blueberry filling into the batter, using a figure-eight motion.
9. Sprinkle the lemon sugar evenly over the muffins.
10. Bake until Muffin tops are golden and just firm, 17 to 19 minutes, rotating the muffin tin from front to back, halfway through baking tin.
12. Cool muffins in muffin tin for 5 minutes, then transfer to wire rack and let cool 5 minutes before serving.
Saturday, September 17, 2011
My new favorite cake- Strawberry-Lime Cream Cake
I am almost drooling down my shirt just thinking about this cake. I made it a couple of weeks ago when we had my brother and his wife over for our monthly family dinner. When I was looking at my favorite food blog for my usual dessert inspiration and came across this cake I was a tad skeptical. I love cake, I love strawberries and I love strawberry cake. However, I wouldn't say I'm a hugely wild fan of limes. BUT...let me just say that there is something about the combination of the strawberries and the lime that totally WORKS! It's a match made in heaven.
The cake is dense and moist and the lime cream and strawberry filling is light and flavorful and just plain delicious. I am so enthralled with this cake that I am going to make it for myself on my birthday. Strawberry season or not I'm having this cake come November! This is actually officially my new favorite white cake recipe too. I think I'll burn all the rest and this will take it's place. It would be incredible with any kind of filling or frosting.
Confession time! When I was making my cake layers I didn't adequately grease my pans and so when I tried to get both layers out which are then to be cut into 2 more layers my cake kinda, sorta, completely fell apart. It was a mess. Determined to put it together I pressed on but it was in no way blog worthy to look at. So I have pinched Mels picture from her blog so you can drool over that.
Strawberry-Lime Cream Cake
/www.melskitchencafe.com
original source- White cake adapted from Betty Crocker, other components adapted from Mels friend, Reyna M.
*Note: this recipe looks like it has a lot of steps, and it does, but each can be made in advance and the cake assembled later. Plus, none of the steps are very difficult. The end result is worth it, trust me!
*Serves 12
White Cake:
2 1/2 cups all-purpose flour
2 cups granulated sugar
1 teaspoon baking powder
1/2 teaspoon baking soda
1/8 teaspoon salt
1 1/3 cups buttermilk
1/2 cup butter, softened
1 teaspoon vanilla
4 egg whites
Preheat the oven to 350 degrees F. In a large bowl, combine the flour, sugar, baking powder, baking soda and salt. Add buttermilk, butter and vanilla. Beat with an electric mixer on low speed for 30 seconds, scraping the bowl as needed. Increase the speed to medium and beat for 2 minutes. Add the egg whites and beat for 2 minutes more, scraping down the sides of the bowl as needed.
Pour the batter into 2 greased and floured 9-inch round cake pans. (I lined the bottom of mine with a parchment circle and greased the top of the parchment circle.) Bake the cakes for 28-30 minutes until a toothpick inserted near the center comes out with moist crumbs. Don’t overbake or the cakes will be dry. Cool the cakes on a wire rack for 10 minutes. Loosen the sides with a butter knife and remove the cakes from the pans to cool completely.
Strawberry Syrup/Puree:
1 pint fresh strawberries, washed and hulled
4 tablespoons sugar
1 teaspoon lemon juice
Combine all the ingredients in a blender and process until smooth.
Lime Cream:
*Note: you can substitute 1 to 1 1/2 cups fresh strawberry jam for the strawberry puree
4 limes, for 1/2 cup fresh lime juice
1 (14-ounce) can sweetened condensed milk
2 cups heavy whipping cream
Zest and juice the limes into a medium bowl. You should have about 1/2 cup lime juice. Add the sweetened condensed milk and mix well. Add the whipping cream and beat until medium-stiff peaks form. Cover with plastic wrap and refrigerate until needed.
Whipped Cream Frosting:
2 cups heavy whipping cream
1/2 cup powdered sugar
1 teaspoon vanilla
1 envelope (about 2 teaspoons) unflavored gelatin
4 tablespoons water
In a small bowl, place the water and sprinkle the gelatin over the top. Let the mixture stand for 3-4 minutes until the gelatin has thickened. Microwave for 20-30 seconds until the gelatin dissolves and the mixture is warm. Remove from the microwave and let the mixture cool to room temperature (don’t let it set up!). In a large bowl, whip the cream, sugar and vanilla until slightly thickened. While beating slowly, gradually add the cooled gelatin to the whipped cream mixture. Whip at high speed until stiff peaks form.
To assemble the cake, slice each cooled cake round in half horizontally to form 4 cake circles. Place one cake layer on a cake plate and spread an even layer of strawberry syrup over the top. Spread a thick layer of lime cream over the jam, leaving a 1/2-inch border around the edge as the top cake layers will press the cream out toward the edges. Repeat the same layering process with the next two layers. Top with the final cake layer and frost the entire cake with the whipped cream frosting. Garnish with fresh limes and strawberries, if desired. Chill for 1-2 hours before serving to let the cake set up.
Monday, September 12, 2011
Sometimes it's the little things
This past week was rough. You know how some weeks are just like that? You spend the week trying to survive it and then when you make it through and you look back you just think "Wow...that was tough." We had one of those weeks last week. On Monday we received some exciting news, but by the middle of the week that exciting news turned out to be one of the biggest disappointments we had had in a while. So to get through it I found myself trying to focus on the many blessings I do have in my life. I held Gabe tighter (if that's even possible), kissed him more (poor kid), thanked my Father in Heaven for the baby I do have and told myself over and over that this is the plan and I have no other choice but to trust in it.
Then...I picked up a paint brush and worked on being distracted...AGAIN!
The end result? My very first pantry. I know it's just a pantry to most. But when you have never had your very own pantry, finally getting your very own pantry is just plain ol excitin! Our food, my bread makers, pannini press, kitchen aid, food storage and various other items now have their very own home and it's NOT in our office. LOL. Brad is very excited about this! Our cereal no longer lives on top of the kitchen cabinets (where most people have decorations) because the box is too tall to fit in our cupboards.
Brad has been working very hard to finish this pantry for me and I am forever grateful. A pantry might seem small to some but sometimes it's the little things.
So close! eeekkk
Wala! I'm sure I'll move everything around a few more times till I get it where I want it but right now I'm just thrilled to have a pantry!
Thursday, September 8, 2011
Weekend project
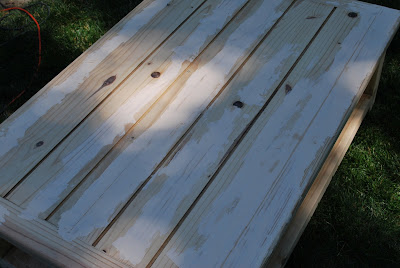
In an attempt to add refurbishing wood furniture to my list of skills and talents this past weekend I finished this little beauty. I had been needing a distraction, something to get my mind of "stuff" and this seemed to help. The ONLY good thing that comes from your parents getting divorced is some of the unwanted items I have inherited. A BBQ and this table. I had been holding on to this table for some time knowing that I didn't have a need for it but not wanting to get rid of it. I knew it had potential. I had been waiting for the right people to give it to at the right time. My brother Jarom and his wife who are just starting out moved across the street from us about a month ago. They have been adjusting to new jobs, new schools, new place, new schedules etc. I have been so impressed with their efforts and their willingness to want to do what is right that I decided they were worthy recipients. My sister in law had wanted the table to be dark, so with that in mind I got working. I gave it to them last night and it was so fun to see how excited they were. I am happy with the way it turned out and even happier that it has a new home with them in their apartment.
Before I have to say electric sanders like the one in the picture are one of man's greatest inventions. I LOVED this thing!
After I had sanded it down and filled in the cracks and imperfections
Sanded and ready for staining
Stain coat...check!
After two coats of stain it's ready for it's new home
Before I have to say electric sanders like the one in the picture are one of man's greatest inventions. I LOVED this thing!
After I had sanded it down and filled in the cracks and imperfections
Sanded and ready for staining
Stain coat...check!
After two coats of stain it's ready for it's new home
Saturday, September 3, 2011
Nursery Love
I'm not sure what exactly to call her since we have never officially met, however I worked closely with her father in law for a few years, so have heard allot about her and her little family and so I feel like I know her well. I'll just call her my blogging friend and someone I admire. Jamie Hill not only makes the most gorgeous and incredible cakes but she has also just finished (on her own) designing and putting together one of the cutest nursery rooms for her baby girl June who is due in a week! Though I don't have a bun in the oven of my own, she has totally got my creative juices flowing and I am so excited to help my sister in law decorate her baby girls room. I wanted to share some of the pictures of Jamie's nursery with you. You will have to stop by her blog though and check out her cakes too. She is VERY talented!
Her blog is http://danhillfamily.blogspot.com/
I thought this was so clever! The little white shelves are actually spice racks from Ikea which she painted and attached to the wall to use as little book shelves. I will likely be using this idea!
Her blog is http://danhillfamily.blogspot.com/
I thought this was so clever! The little white shelves are actually spice racks from Ikea which she painted and attached to the wall to use as little book shelves. I will likely be using this idea!
Thursday, September 1, 2011
Oreo Cheesecake Bites
I love cheesecake, Gabe LOVES oreos and Brad loves food. Can you say win win?! These lived up to every expectation I had, we thoroughly enjoyed these. This recipe is a keeper fo sho!
Oreo Cheesecake Bites
www.melskitchencafe.com
*Makes 36 or more bites, depending on size
36 Oreo Cookies, divided
1/4 cup (4 tablespoons) butter
4 packages (8-ounces each) cream cheese, softened
1 cup granulated sugar
1 cup sour cream
1 teaspoon vanilla
4 large eggs
optional
4 ounces semisweet chocolate
4 ounces white chocolate
Preheat the oven to 325°F.
Line a 9×13-inch baking pan with foil, with ends extending over sides. Finely crush 24 Oreo cookies. Melt 1/4 cup butter; mix with crumbs. Press onto bottom of prepared pan.
In a large bowl, beat the cream cheese and sugar with mixer until blended. Add sour cream and vanilla; mix well. Add eggs, one at a time, beating after each just until blended. Chop remaining cookies. Gently stir into batter; pour over crust.
Bake the cheesecake for about 35-40 minutes or until the sides are set and the center is almost set. Cool completely on a wire rack in the pan.
When the cheesecake is completely cooled, cover with plastic wrap and refrigerate for at least 2 hours. When chilled, remove the cheesecake using the foil overhang and cut the cheesecake into bite-sized pieces.
Optional
I just melted some milk chocolate chips on mine to make them look extra pretty because I delived some to my brother and his wife for their date night treat.
Place the cheesecake bites on a wax or parchment paper-lined baking tray. Melt the semisweet chocolate and white chocolate in separate bowls (I use the microwave on 50% power, stirring frequently). Pour the melted chocolate into a ziploc bag, one for the semisweet chocolate, one for the white chocolate. Snip a small corner off the corner of the bag and drizzle the chocolate over the cheesecake bars. Chill the bars until ready to serve. Alternately, the drizzled bites can be frozen in an airtight container for up to a month. Let them defrost in the refrigerator and serve chilled.
Gabe took care of any leftover chocolate!
Tuesday, August 30, 2011
Speechless
My sister in law Shanna recently took some family pictures of us when she was in town and I cannot stop looking at this one of my baby. When he smiles his eyes light up in a way I've never seen in anyone else before. Just looking at this photo makes the rest of the world melt away and I feel two things HAPPY and so very BLESSED. This little man makes all that life has to throw at us worth it. I still have to pinch myself most days... to think that I get to be his Mum! I am the luckiest girl in the world.
Thanks Shanna! You did a fantastic job!
Monday, August 29, 2011
The BIG 4!
This past Thursday my baby turned the big 4! Because we only have one and we love that one SO much we decided this year to celebrate Gabe's birthday week. Why not, right?! We tried to do something fun every day to celebrate his coming birthday. We had a blast.
This year Gabe looked forward to his birthday for a couple of months before hand. He would say "When is my birthday coming Mum?...it's not coming." He gave us a very detailed and specific list of what he would like and of course we spoiled him rotten. The night before his birthday Brad and I were up wrapping presents and half way through Brad looked at me and said "Do you think you went a little overboard?" I was disgusted by this, um, me? Go overboard? For my son's birthday? NEVER! =)
We kicked it off the Sunday before with Nana Sandy and Papa Clark. After our family dinner, we did presents and had Oreo (Gabe's fave) cupcakes with Oreo frosting. Nana and Papa bought Gabe his first big boy bike which he was excited about and some other neat gifts. Nana Sandy has the pics from this which I will have to post when I get them.
On Monday Brad and I took Gabe and his cousin Andrew to see Kung Fu Panda at the Kaysville theatre. The boys loved the movie and spending some time together. Andrew gave Gabe a cool transformer and a neat nerf gun which he has had lots of fun playing with. I love watching those two cute boys together. It is hilarious to listen to them have their own little conversations. They loved having their own popcorn, sprite and nerds to eat. We will miss not having Andrew close by while they live in Elko, NV.
Andrew giving Gabe his present
I love Gabe's face in this one. He was so excited.
On Tuesday night after dinner, we went and got frozen yogurt at Yogotogo. Gabe loves that he can pick his own toppings!
Look at that hair! Haircuts coming up this week I think!
What fun is eating ice cream if you don't get some on your nose?
On Wednesday for school Gabe took some birthday cupcakes to share with his class mates. Spiderman cupcakes of course. It is a rule of the pre-school that any food brought in to share must be store bought or made in the pre-school kitchen. Since I had to work full time this past week store bought was cool with me. Gabe was so excited to take them to school and I just love this picture of him with his teacher Ms Cassie. He loves Ms Cassie and he loves school. He was thrilled to have the kids sing happy birthday to him.
Since my baby would rather eat beans, peas, carrots or pistachios than cake, this year I opted not to spend hours making and decorating a fancy cake. Instead, on Wednesday night Gabe and I had fun messing up the kitchen making some cupcakes. Gabe loves to bake with me so we had fun spending some time in the kitchen together. He requested white cupcakes and strawberry frosting. I don't even know that he ate one whole cupcake but he did love cracking the eggs, measuring the ingredients and of course frosting and decorating the cupcakes.
On the BIG day Daddy went into work a little later so that when we woke up we could do presents in bed. After presents we had pancakes for breakfast. Then after breakfast I took Gabe and his little cousin Payton to the zoo. Gabe was so excited to see the animals but especially the dinosaurs they had there for "Zoorasic park". This year Nana Trudy and Mike gave Gabe some money for his birthday. He was thrilled to have his own money. Lately Gabe has been interested in money. We have given him some little jobs around the house and he likes to do them, get paid and then put his money in his wallet. He was thrilled to be able to use some of his money from Nana Trudy to buy a toy dinosaur at the zoo. After the zoo we got some McDonald's for lunch and went home for nap time. After nap time Gabe and I went swimming at the Clearfield Aquatic Center. Gabe and I had a blast swimming together as it was a HOT day. Finally later that night we went out to dinner with Uncle Jarom, Aunty Bre and baby Payton to Sizzler (Gabe's choice). Gabe loves to have steak at Sizzler. It was so much fun to go with Uncle Jarom, Aunty Bre and baby Payton and they gave Gabe the coolest Dragon which he has loved playing with.
Opening presents
So excited! The pterdactyl he is holding was big on his wish list this year. When he opened it he said "A pteradactyl, exactly what I wanted!" We both laughed. It was worth the 3 stores I went to, and 6 stores I called trying to find it.
The Zoo!
The TREX! He was so excited to see the T-rex but wasn't too sure at first how close he wanted to get to it. After a while he walked right up to the fence, but then when he roared Gabe came running. I love these sequence shots of him running back towards me.
He wanted a picture on the lions
Gabe is so cute with Payton. While we were walking around the zoo, he was concerned that the sun was in her eyes so tried blocking it with blanket.
Baby Payton
My little lady killer! I can say it and I will my boy is GORGEOUS!
He went on the merry go round twice and loved it!
Subscribe to:
Posts (Atom)