I am almost drooling down my shirt just thinking about this cake. I made it a couple of weeks ago when we had my brother and his wife over for our monthly family dinner. When I was looking at my favorite food blog for my usual dessert inspiration and came across this cake I was a tad skeptical. I love cake, I love strawberries and I love strawberry cake. However, I wouldn't say I'm a hugely wild fan of limes. BUT...let me just say that there is something about the combination of the strawberries and the lime that totally WORKS! It's a match made in heaven.
The cake is dense and moist and the lime cream and strawberry filling is light and flavorful and just plain delicious. I am so enthralled with this cake that I am going to make it for myself on my birthday. Strawberry season or not I'm having this cake come November! This is actually officially my new favorite white cake recipe too. I think I'll burn all the rest and this will take it's place. It would be incredible with any kind of filling or frosting.
Confession time! When I was making my cake layers I didn't adequately grease my pans and so when I tried to get both layers out which are then to be cut into 2 more layers my cake kinda, sorta, completely fell apart. It was a mess. Determined to put it together I pressed on but it was in no way blog worthy to look at. So I have pinched Mels picture from her blog so you can drool over that.
Strawberry-Lime Cream Cake
/www.melskitchencafe.com
original source- White cake adapted from Betty Crocker, other components adapted from Mels friend, Reyna M.
*Note: this recipe looks like it has a lot of steps, and it does, but each can be made in advance and the cake assembled later. Plus, none of the steps are very difficult. The end result is worth it, trust me!
*Serves 12
White Cake:
2 1/2 cups all-purpose flour
2 cups granulated sugar
1 teaspoon baking powder
1/2 teaspoon baking soda
1/8 teaspoon salt
1 1/3 cups buttermilk
1/2 cup butter, softened
1 teaspoon vanilla
4 egg whites
Preheat the oven to 350 degrees F. In a large bowl, combine the flour, sugar, baking powder, baking soda and salt. Add buttermilk, butter and vanilla. Beat with an electric mixer on low speed for 30 seconds, scraping the bowl as needed. Increase the speed to medium and beat for 2 minutes. Add the egg whites and beat for 2 minutes more, scraping down the sides of the bowl as needed.
Pour the batter into 2 greased and floured 9-inch round cake pans. (I lined the bottom of mine with a parchment circle and greased the top of the parchment circle.) Bake the cakes for 28-30 minutes until a toothpick inserted near the center comes out with moist crumbs. Don’t overbake or the cakes will be dry. Cool the cakes on a wire rack for 10 minutes. Loosen the sides with a butter knife and remove the cakes from the pans to cool completely.
Strawberry Syrup/Puree:
1 pint fresh strawberries, washed and hulled
4 tablespoons sugar
1 teaspoon lemon juice
Combine all the ingredients in a blender and process until smooth.
Lime Cream:
*Note: you can substitute 1 to 1 1/2 cups fresh strawberry jam for the strawberry puree
4 limes, for 1/2 cup fresh lime juice
1 (14-ounce) can sweetened condensed milk
2 cups heavy whipping cream
Zest and juice the limes into a medium bowl. You should have about 1/2 cup lime juice. Add the sweetened condensed milk and mix well. Add the whipping cream and beat until medium-stiff peaks form. Cover with plastic wrap and refrigerate until needed.
Whipped Cream Frosting:
2 cups heavy whipping cream
1/2 cup powdered sugar
1 teaspoon vanilla
1 envelope (about 2 teaspoons) unflavored gelatin
4 tablespoons water
In a small bowl, place the water and sprinkle the gelatin over the top. Let the mixture stand for 3-4 minutes until the gelatin has thickened. Microwave for 20-30 seconds until the gelatin dissolves and the mixture is warm. Remove from the microwave and let the mixture cool to room temperature (don’t let it set up!). In a large bowl, whip the cream, sugar and vanilla until slightly thickened. While beating slowly, gradually add the cooled gelatin to the whipped cream mixture. Whip at high speed until stiff peaks form.
To assemble the cake, slice each cooled cake round in half horizontally to form 4 cake circles. Place one cake layer on a cake plate and spread an even layer of strawberry syrup over the top. Spread a thick layer of lime cream over the jam, leaving a 1/2-inch border around the edge as the top cake layers will press the cream out toward the edges. Repeat the same layering process with the next two layers. Top with the final cake layer and frost the entire cake with the whipped cream frosting. Garnish with fresh limes and strawberries, if desired. Chill for 1-2 hours before serving to let the cake set up.
Saturday, September 17, 2011
Monday, September 12, 2011
Sometimes it's the little things
This past week was rough. You know how some weeks are just like that? You spend the week trying to survive it and then when you make it through and you look back you just think "Wow...that was tough." We had one of those weeks last week. On Monday we received some exciting news, but by the middle of the week that exciting news turned out to be one of the biggest disappointments we had had in a while. So to get through it I found myself trying to focus on the many blessings I do have in my life. I held Gabe tighter (if that's even possible), kissed him more (poor kid), thanked my Father in Heaven for the baby I do have and told myself over and over that this is the plan and I have no other choice but to trust in it.
Then...I picked up a paint brush and worked on being distracted...AGAIN!
The end result? My very first pantry. I know it's just a pantry to most. But when you have never had your very own pantry, finally getting your very own pantry is just plain ol excitin! Our food, my bread makers, pannini press, kitchen aid, food storage and various other items now have their very own home and it's NOT in our office. LOL. Brad is very excited about this! Our cereal no longer lives on top of the kitchen cabinets (where most people have decorations) because the box is too tall to fit in our cupboards.
Brad has been working very hard to finish this pantry for me and I am forever grateful. A pantry might seem small to some but sometimes it's the little things.
So close! eeekkk
Wala! I'm sure I'll move everything around a few more times till I get it where I want it but right now I'm just thrilled to have a pantry!
Thursday, September 8, 2011
Weekend project
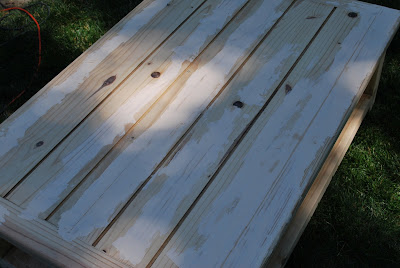
In an attempt to add refurbishing wood furniture to my list of skills and talents this past weekend I finished this little beauty. I had been needing a distraction, something to get my mind of "stuff" and this seemed to help. The ONLY good thing that comes from your parents getting divorced is some of the unwanted items I have inherited. A BBQ and this table. I had been holding on to this table for some time knowing that I didn't have a need for it but not wanting to get rid of it. I knew it had potential. I had been waiting for the right people to give it to at the right time. My brother Jarom and his wife who are just starting out moved across the street from us about a month ago. They have been adjusting to new jobs, new schools, new place, new schedules etc. I have been so impressed with their efforts and their willingness to want to do what is right that I decided they were worthy recipients. My sister in law had wanted the table to be dark, so with that in mind I got working. I gave it to them last night and it was so fun to see how excited they were. I am happy with the way it turned out and even happier that it has a new home with them in their apartment.
Before I have to say electric sanders like the one in the picture are one of man's greatest inventions. I LOVED this thing!
After I had sanded it down and filled in the cracks and imperfections
Sanded and ready for staining
Stain coat...check!
After two coats of stain it's ready for it's new home
Before I have to say electric sanders like the one in the picture are one of man's greatest inventions. I LOVED this thing!
After I had sanded it down and filled in the cracks and imperfections
Sanded and ready for staining
Stain coat...check!
After two coats of stain it's ready for it's new home
Saturday, September 3, 2011
Nursery Love
I'm not sure what exactly to call her since we have never officially met, however I worked closely with her father in law for a few years, so have heard allot about her and her little family and so I feel like I know her well. I'll just call her my blogging friend and someone I admire. Jamie Hill not only makes the most gorgeous and incredible cakes but she has also just finished (on her own) designing and putting together one of the cutest nursery rooms for her baby girl June who is due in a week! Though I don't have a bun in the oven of my own, she has totally got my creative juices flowing and I am so excited to help my sister in law decorate her baby girls room. I wanted to share some of the pictures of Jamie's nursery with you. You will have to stop by her blog though and check out her cakes too. She is VERY talented!
Her blog is http://danhillfamily.blogspot.com/
I thought this was so clever! The little white shelves are actually spice racks from Ikea which she painted and attached to the wall to use as little book shelves. I will likely be using this idea!
Her blog is http://danhillfamily.blogspot.com/
I thought this was so clever! The little white shelves are actually spice racks from Ikea which she painted and attached to the wall to use as little book shelves. I will likely be using this idea!
Thursday, September 1, 2011
Oreo Cheesecake Bites
I love cheesecake, Gabe LOVES oreos and Brad loves food. Can you say win win?! These lived up to every expectation I had, we thoroughly enjoyed these. This recipe is a keeper fo sho!
Oreo Cheesecake Bites
www.melskitchencafe.com
*Makes 36 or more bites, depending on size
36 Oreo Cookies, divided
1/4 cup (4 tablespoons) butter
4 packages (8-ounces each) cream cheese, softened
1 cup granulated sugar
1 cup sour cream
1 teaspoon vanilla
4 large eggs
optional
4 ounces semisweet chocolate
4 ounces white chocolate
Preheat the oven to 325°F.
Line a 9×13-inch baking pan with foil, with ends extending over sides. Finely crush 24 Oreo cookies. Melt 1/4 cup butter; mix with crumbs. Press onto bottom of prepared pan.
In a large bowl, beat the cream cheese and sugar with mixer until blended. Add sour cream and vanilla; mix well. Add eggs, one at a time, beating after each just until blended. Chop remaining cookies. Gently stir into batter; pour over crust.
Bake the cheesecake for about 35-40 minutes or until the sides are set and the center is almost set. Cool completely on a wire rack in the pan.
When the cheesecake is completely cooled, cover with plastic wrap and refrigerate for at least 2 hours. When chilled, remove the cheesecake using the foil overhang and cut the cheesecake into bite-sized pieces.
Optional
I just melted some milk chocolate chips on mine to make them look extra pretty because I delived some to my brother and his wife for their date night treat.
Place the cheesecake bites on a wax or parchment paper-lined baking tray. Melt the semisweet chocolate and white chocolate in separate bowls (I use the microwave on 50% power, stirring frequently). Pour the melted chocolate into a ziploc bag, one for the semisweet chocolate, one for the white chocolate. Snip a small corner off the corner of the bag and drizzle the chocolate over the cheesecake bars. Chill the bars until ready to serve. Alternately, the drizzled bites can be frozen in an airtight container for up to a month. Let them defrost in the refrigerator and serve chilled.
Gabe took care of any leftover chocolate!
Subscribe to:
Posts (Atom)