Tuesday, March 31, 2009

Carrot Cake Sandwich Cookies- The cookies that HATE me!

I had been feeling so crappy all weekend and for the first part of this week and so thought that since I was stuck at home sick and miserable I'd try and cheer myself up by doing some baking. Bad idea. These cookies or this recipe HATE me and though I managed in the end to get a few good cookies from the batch I don't think I'll be making these again any time soon. Making the dough itself wasn't difficult though it was time consuming and messy but getting the size of the cookie and the cooking time just right was a challenge for me. I've decided that when you’re not feeling hot, tackling a tricky cookie recipe isn't the best idea. I felt more discouraged than anything by the time I was done with these. They were very good though. I'm just not sure they were THAT good. I would have enjoyed a good piece of carrot cake with cream cheese frosting much more.

Carrot Cake Sandwich Cookies
Martha Stewart

1 cup packed light-brown sugar
1 cup granulated sugar
1/2 pound (2 sticks) unsalted butter, room temperature
2 large eggs, room temperature
1 teaspoon pure vanilla extract
2 cups all-purpose flour
1 teaspoon baking soda
1 teaspoon baking powder
1/4 teaspoon salt
1 teaspoon ground cinnamon
1/2 teaspoon ground nutmeg
1/2 teaspoon ground ginger
2 cups old-fashioned rolled oats
1 1/2 cups finely grated carrots, (about 3 large carrots)
1 cup raisins - I omitted these because I don't like them
Cream Cheese Frosting

Directions
Preheat oven to 350 degrees. Line two baking sheets with Silpat baking mats or parchment paper, and set aside. In the bowl of an electric mixer fitted with the paddle attachment, combine sugars and butter; beat until light and fluffy, 3 to 4 minutes. Add eggs and vanilla, and beat on medium speed until well combined.

In a large bowl, sift together flour, baking soda, baking powder, salt, cinnamon, nutmeg, and ginger; stir to combine. Gradually add flour to butter mixture; mix on a low speed until just blended. Mix in oats, carrots, and raisins. Chill dough in refrigerator until firm, at least 1 hour (***see note***).

Using a 1/2-ounce ice-cream scoop, scoop dough onto prepared baking sheets (I didn't have one so used a tbls spoon- see note), leaving 2 inches between cookies. Transfer to oven, and bake until browned and crisped, rotating pan halfway through baking to ensure even color, 12 to 15 minutes. Transfer to a wire rack to cool. Repeat baking process with remaining dough. Once cooled completely, use an offset spatula to spread about 2 teaspoons of cream-cheese filling onto a cookie. Sandwich together with a second cookie. Repeat with remaining cookies. Store in an airtight container for up to 3 days in the refrigerator.

(***Note***)- I waited an hour and then tried to make these. It wasn't happening. My dough wasn't hard enough and the cookies baked flatter than a pancake. It was getting late and so I decided to try again in the morning. It worked much better. The batter must be as solid as it can be for these to work.
(***Note***)- I didn't have an 1/2 ounce ice cream scoop and I'll be honest I have no clue how big/little that is. So I just guessed and rolled balls to the size I thought best. Bad idea. If you roll them too big these just spread like crazy and bake flatter than flat. After much trial and error I found that a smallish tablespoon size ball was the right size.

Monday, March 30, 2009

Cheesy Basil-Stuffed Chicken Breasts

A week or so ago on my Monday off I was looking through my Cooks Country recipe book and I came across this recipe. I had never tried any recipes that called for stuffing chicken breasts but had always wanted to. To be honest I hadn't tried because it looked a little tricky and I figured I would just make a mess of it. This recipe just sounded really good though so I thought what the heck. While mine didn't look perfect, it sure did taste yummy.

Cheesy Basil-Stuffed Chicken Breasts
Cooks Country


Avoid thin chicken breasts for this recipe—they are difficult to stuff without tearing (unfortunately I only had frozen chicken breasts and they really were too thin but it was all I had so I made do) Whole-milk block mozzarella will provide the creamiest filling; pre-shredded or part-skim mozzarella will also work, but the filling will be grainy. To make fresh bread crumbs, process 2 slices of hearty white sandwich bread in the food processor.

1 cup shredded mozzarella cheese
1/4 cup minced fresh basil (I used dried basil)
2 tablespoons heavy cream
1 tablespoon fresh lemon juice
3 cloves garlic , minced
Table salt and ground black pepper
4 boneless, skinless chicken breasts (6 to 8 ounces each)
3 tablespoons mayonnaise
1 cup fresh bread crumbs
2 tablespoons extra virgin olive oil
1 pint cherry tomatoes, halved (I didn't have cherry tomatoes so just chopped up a regular tomato I had in the fridge).

1. Adjust oven rack to middle position and heat oven to 425 degrees. Combine cheese, 2 tablespoons basil, cream, lemon juice, 2 teaspoons garlic, 1/2 teaspoon salt, and pepper to taste in medium bowl.

2. Cut pocket in chicken breasts, stuff with cheese mixture, and seal. Transfer stuffed breasts to 13 by 9-inch baking dish and spread tops evenly with mayonnaise.

3. Combine bread crumbs, remaining garlic, remaining 2 tablespoons basil, and 1 tablespoon oil. Sprinkle crumb mixture over chicken, pressing lightly to adhere.


4. Toss tomatoes with remaining tablespoon oil, 1/2 teaspoon salt, and pepper to taste. Arrange in baking dish around chicken. Bake until crumbs are golden brown and thickest part of chicken registers 160 degrees on instant-read thermometer, about 25 minutes. Serve.


I loved the homemade bread crumbs in this recipe. I had never made homemade bread crumbs before but see why it is so worth it now.

Sunday, March 29, 2009

Nats Scalloped, Creamed, Cheesy or Whatever You Want to Call Them Potatoes

Last week I was craving some scalloped potatoes or creamed potatoes as my mother calls them. Growing up my mum made her own version and we would have them fairly regularly. I always liked them. I'm not really home enough though to spend this long on a side dish so I don't make these as much as I would like to. In fact this was the first time I had made them since I moved to the US. I didn't have a recipe of my own and so looked at a few different ones and then came up with this one using ingredients I had in my pantry and fridge. I was really pleased with these and have been wanting them again ever since.

Nats Scalloped Potatoes
Serves 4 people


Ingredients
1 teaspoon of minced garlic
Italian seasoning- As much or as little as you like
4 tbls spoons of unsalted butter- divided
1/4 cup of buttermilk
Approx 3/4 cup to 1 cup of cream
Salt and pepper
Approx 1 cup of of grated cheddar cheese
Approx 1/2 cup of grated parmesan cheese
4 large potatoes - I used Yukon Gold because that is what I had on hand.

Method

Preheat oven to 375 degrees

Melt two tablespoons of butter. Add to the melted butter the minced garlic. Using a pastry brush spread butter and garlic mixture over the bottom and sides of a cornware or glass baking dish. Set it aside to dry.

Peel and slice potatoes into relatively thin slices. (Due to time constraints- I then boiled my potatoes until they were just shy of tender).

In a separate bowl combine buttermilk, cream, salt and pepper, and seasoning.

Cut the remaining two tablespoons of butter into small pieces.

Thursday, March 26, 2009

Thankful Thursday

Brad's Aunty Melinda has a great and funny blog (http://sickofchub.blogspot.com/)and every Thursday she does a special "Thankful Thursday" post. I am going to follow suit on this Thursday.

The past couple of weeks have not been fun for our little family. My little guy came down with a horrible sinus infection a couple of Sunday's ago and it quickly became close to pneumonia, after a few days of having his sinus infection he seemed to land some kind of viral infection on top of it. It was miserable for him and miserable for us. Just as he seemed to be clearing the woods over the weekend it was my turn.

Last Friday I started to get a couple of mouth ulcers or canker sores as they are called here and by Sunday my two had started to multiply and by Monday my two had become 15 or 16. I was in agony. I had them on my tongue, top and bottom lip, inside my cheeks and on my gums. Sleeping, eating, talking, breathing you name it, it hurt. I got online and started to look up any remedies I could find. On Sunday I ate an entire BIG tub of yogurt and then on Monday almost ate an entire bag of licorice (nothing helped). It is now Thursday and I am still far from feeling better. That being said I am thankful.

On Monday my sister in law Shanna dropped by after work to drop off some allergy prescriptions and saw the mess I was. A couple of hours later she returned with her hubby in toe and they had bought me a bunch of medicines to hopefully help me be a little more comfortable while I rode out the storm. Then on Wednesday they came again and brought me Jamba Juice as I was only really able to handle SOME liquids. I can not say enough how thankful I am for my thoughtful brother Brian and sister Shanna. I love you guys!

As Brian and Shanna were leaving on Tuesday night my good friend Amber arrived. She had stopped by on her way home from work with a bunch of flowers to help cheer me up. I was overwhelmed with gratitude for the good and thoughtful people in my life.

I am also thankful to my in-laws who took my little guy for a couple of hours on Tuesday so that I could get some rest.

My mother had this virus when she was first pregnant with me and assures me that once you get this virus once, you never get it again. That is what she was told and I sure hope she is right.

Lemon Chicken

My friend Bec in Australia recently started her own food blog. Her second recipe she posted was this one for Lemon Chicken. I made it on Sunday night for dinner. I wasn't feeling the greatest so I know I didn't enjoy it as much as I would have if I were feeling well but it was still good and my husband enjoyed it. One thing I loved about this chicken dish was that the chicken was SO tender. I think next time I make it though I will halve the amount of lemon juice and double the amount of honey so it is more honeyish that lemony. That is just my personal preference though. Thanks for a great and easy recipe Bec! I miss you!!!
Lemon chicken
http://mybesthomecooking.blogspot.com/

Recipe thanks to AWW
INGREDIENTS

8 small chicken breast fillets
1 egg white
½ teaspoon sugar
1 teaspoon salt
1 teaspoon grated green ginger
flour
2 tablespoons oil
30g butter
3 shallots
1 lemon
Lemon sauce
125ml (½ cup) lemon juice
1 chicken stock cube
2 tablespoons cornflour
2 tablespoons honey
2½ tablespoons brown sugar
1 teaspoon grated green ginger
1¾ cups water

METHOD

Combine egg white, sugar, salt and ginger, mix well, add fillets, turn in mixture, stand 10 minutes. Coat lightly with flour. Heat oil and butter in pan, add half the fillets, fry until golden brown on both sides and until tender, remove from pan, keep warm. Repeat with remaining fillets. Spoon Lemon Sauce over fillets. Garnish with chopped shallots and thinly sliced lemon.
Lemon sauce: Combine lemon juice, crumbled stock cube, cornflour, honey, brown sugar, ginger and water in saucepan, stir over low heat until sauce boils and thickens.

Another Fast and Easy Pizza Dough Recipe

The past two weekends I have thoroughly enjoyed making our own pizza for dinner on Saturday. Not only have I been proud of myself for actually being able to make it (and it working out so great) but I love that it is better for us to eat and easier on the wallet. One of the best things about homemade pizza has to be that it is not at all greasy like regular pizza tends to be. I don't feel the least bit guilty eating my homemade pizza. My hubby liked both recipes but after eating this pizza last weekend he actually said "You couldn't get pizza this good at any pizza place" I almost cried. Brad is a man of few words sometimes and he isn't the most complementary when it comes to what I make. That is just him, he is hungry, he eats and he is satisfied. It isn't that he doesn't enjoy it, for him food is just food. Needless to say I was pleased that he liked it so much and so did I.

Fast and Easy Pizza Dough Recipe
http://realmomkitchen.blogspot.com


3 cups flour, more or less
1 tablespoon honey, heaping
1 tablespoon oil, heaping
1 cup warm water
1 tablespoon yeast
1/2 teaspoon garlic salt

Preheat oven to 475 degrees. (If using a pizza stone, let stone heat for at least 30 minutes in the oven before baking pizza.)

Mix all pizza dough ingredients together, except the flour (I dissolved my yeast in the water and let it sit for 5 minutes before adding the rest of the ingredients). Add flour and knead for a couple of minutes. I use my Bosch mixer.

After you have kneaded the dough for a couple of minutes roll out on a lightly floured surface. Put the pizza into pan or on a pizza stone (I don't have a pizza stone so I just use a cookie sheet). Top dough with sauce and toppings.

If baking in a sheet pan, bake for about 12 minutes (checking often) until crust is browned and cheese is golden and bubbly. If baking on the preheated pizza stone, slide pizza onto stone and bake for about 8 minutes. Makes 1 large pizza, plenty for two hungry adults.

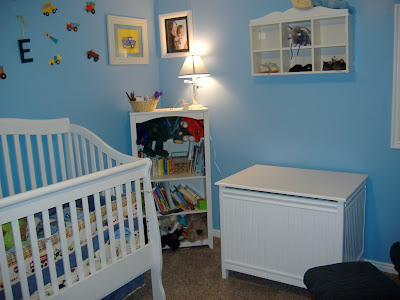
THE toy box and some pics of Gabe's nursery

A while ago I mentioned that my hubby was making Gabe a toy box for his room. With my husband being busy with work and school etc it has been a labor of love but this past weekend he finished it. I am so pleased with the result and so proud of my Brad for making such a cool toy box for our little angel. Brad you are amazing! I am so incredibly grateful to have a husband who is handy and not just handy but flat out brilliant when it comes to working with his hands. Thank you honey!
The project begins! Notice it is sunny outside and my hubby is in a t-shirt. I think he started it towards the end of the summer last year! I also love how he is using our mailbox as a work bench. No one can say he isn't innovative. Brad one day I'm going to buy you the nicest workbench ever made and we will have a garage for you to work in too. I promise!

Gabe loves to be involved so we moved the project inside so he could help daddy!


Starting to take shape


Almost done

I love the bead board that Brad put around it. It just finished it off so nicely. My favorite feature however is the gap Brad left around the edge so that Gabe can't get his fingers stuck when it closes. I would never have thought of that. My hubby is the best!

Ta da...All finished and moved into Gabe's nursery


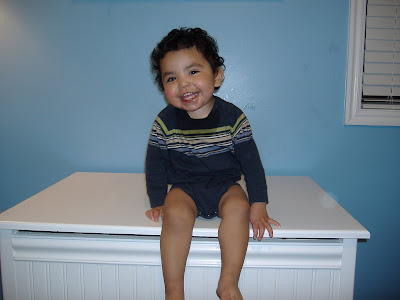
No pants- we were getting ready for bed!Gabe loves his new toy box!

Cutest smile in the world!

Wednesday, March 25, 2009

Australian Pikelets - A snack time favorite

Growing up in both Australia and New Zealand, one of my favorite snack time treats was pikelets. To most they look simply like a mini pancake but to me they taste like home. Though similar to the pancake we rarely ate these at breakfast time, but rather enjoyed them as an afternoon or after school snack. I like them warm or cold but I think that they are best served warm with a spread of butter and topped with whipped cream and jam. If you have ever tasted New Zealand butter or cream (or most foods for that matter) you know it's the best in the world! These little treats are slightly more dense than the average pancake and due to the amount of sugar in them tend to be a little sweeter. What can I say I love them. More than that I love that my little boy loves them too.


Pikelets

Ingredients
1 egg
1/4 cup sugar
3/4 cup milk (approx)
1 cup flour
1 teaspoon baking powder
1/4 teaspoon salt
1 ounce butter (optional)

Directions

Beat the egg and sugar until thick and add with the milk to the sifted flour, salt
and baking powder.

Add the melted butter last.

Mix until smooth and cook in spoonfuls on a hot greased griddle or frypan.

Wednesday, March 18, 2009

Hawaiian Haystacks- An easy peasy dinner

I had only ever had these once before I made them for dinner the other night. The first time I ate these was while I was on a holiday to the US back more than 7 years ago. I was staying with my future inlaws and Sandy had made them for dinner. I had never seen anything like it but enjoyed them then and can't believe it has taken me this long to make them for my own little family. Dinner doesn't get much easier than this. This was a perfect tasty, and easy dinner for a busy week night. If you haven't tried these or if it has just been a while I suggest you give them a go.

Hawaiian Haystacks
http://realmomkitchen.blogspot.com

This is not a picture of ours but is from http://realmomkitchen.blogspot.com
Stove top method:

2 cans of cream of chicken soup
1 can of milk or so

Heat soup and milk on the stove until heated through. You want this to be the consistency of gravy. You can add more milk if the mixture is too thick. Add the chicken and cook til warm.

Crock pot method:

2 cans cream of chicken soup
2 frozen chicken breasts
milk

Put chicken breasts in the crock pot and then cover with soup. Cook on low for 6-8 hours. Remove chicken from the crock pot and shred or dice the chicken and return to the crock pot. Add enough milk to make the consistency of gravy.

Serve the sauce over cooked rice. I usually plan on at least one cup per person. Then top with any of the following toppings. The first nine listed are what I like on mine, but I don't always have all of those ingredients.

cooked chicken breasts- I cooked mine in 1 cup of chicken broth with some added herbs and spices (see pic below) in my crockpot so that my chicken would be yummy and flavorful. I love this dressing mix, it just adds such a nice flavor to any chicken dish.


shredded cheddar cheese
pineapple tidbits
sliced olives
diced green onion
chopped celery
shredded coconut
slice almonds
diced fresh mushroom
Chow mien noodles
diced tomatoes
peas
mandarin oranges
raisins
diced green pepper
water chestnuts
cashews
soy sauce
corn
or anything else that you think would be good

Buttermilk Banana Muffins

On Tuesday while I was home with a sick toddler and a busted back I decided to do something with the bananas on my bench that were quickly ripening and the buttermilk in my fridge which was close to expiring. The end result was a tasty muffin that I think I would definitely make again. I loved these warm with a little butter but knew that by the time my husband came home and tried one that they would no longer be warm. I tend to like things on the plainer and not so sweet side whereas my hubby has quite the sweet tooth. I ended up making some cream cheese frosting to go on top which just added to this yummy muffin.

Banana-Buttermilk Muffins
From Williams-Sonoma Essentials of Healthful Cooking.

Ingredients
1 cup all-purpose flour
3/4 cup whole wheat flour
1/2 cup sugar (I used 1/4 cup of white sugar and 1/4 cup of brown sugar)
2 teaspoons baking powder
1 teaspoon baking soda
1 cup low-fat buttermilk
1 cup mashed ripe banana
2 tablespoons canola oil
1 large egg
1 teaspoon vanilla
1/2 cup chopped walnuts (I omitted the nuts as I didn't have any on hand)

Directions

1-Preheat oven to 375°F.
2-Spray 12 regular muffin cups with non-stick cooking spray.
3-In a large bowl, mix together the flours, sugar, baking powder and baking soda.
4-In separate bowl, whisk together the buttermilk, mashed banana, oil, egg and vanilla.
5-Pour wet ingredients over dry ingredients and stir just until blended.
6-Spoon batter into muffin cups, filling about three-fourths full.
7-Sprinkle tops evenly with nuts.
8-Bake until lightly brown and a toothpick inserted in center comes out clean, approximately 15 to 20 minutes.
9-Allow to cool in pan on wire rack for 15 minutes, then turn out onto rack and cool completely.

Honey Lime Chicken Enchiladas

A friend of mine Holly from http://phemomenon.blogspot.com/ made these last week on Good Things Utah. She had dubbed these as "Rock your world" Honey Lime Chicken Enchiladas. Did they rock my world? No. Were they good? Yes. If someone tells me that a recipe will "rock my world" then that immediately means I am going to have high hopes and great expectations when I try a recipe.

My little family did enjoy these but I would not give them the high rating that Holly did. I'd say they were a 3 out of 5 star dish. For my version of the recipe I used only 1/2 a tsp of the chili powder and still felt as though these were too hot (keep in mind my husband and I are wimps!) There was also a little too much lime flavor for me. Next time I'll keep the chili powder to a pinch and use maybe half of the lime juice. I'm tempted to try using lemon instead of the lime too. I'll let you know how that goes.

Honey Lime Chicken Enchiladas
(From Brittany at The Sisters' Cafe via Melanie at My Kitchen Cafe)


1/2 tablespoons honey
1/4 cup lime juice (approx. 1 large lime)
1 tablespoon chili powder (I used 1/2 tsp)
1/2 teaspoon garlic powder
1 pound chicken, cooked and shredded (I used a rottisere chicken from Sams Club)
8-10 flour tortillas (I made 12 smaller ones)
1 pound monterey jack cheese, shredded (I used cheddar and monterey jack)
14 ounces mild green enchilada sauce
1 cup heavy cream (I only used about 1/2 cup)

Mix the honey, lime juice, chili powder and garlic together and toss with the shredded chicken. Let it marinate for at least 1/2 hour (or toss together in a Ziploc bag and let it sit in the fridge for a few hours).

Pour about 1/2 cup enchilada sauce on the bottom of a 9X13 baking pan. Fill flour tortillas with chicken and shredded cheese, saving about 1 cup of cheese to sprinkle on top of enchiladas. Mix the remaining enchilada sauce with the cream and leftover marinade. Pour sauce on top of the enchiladas and sprinkle with cheese. Bake at 350 degrees for 30 minutes until brown and crispy on top.

Serve with sour cream, rice and black beans.

Chocolate Cupcakes with Cookies and Cream Frosting

On the third Sunday of every month we get together as a Family for Sunday dinner at my in-laws house. Each month the three of us older sisters have a food assignment which rotates (salad, rolls, dessert). This month it was my turn to make dessert. I made these YUMMY Chocolate Cupcakes with Cookies and Cream Frosting. I knew I wanted to try this recipe for the cookies and cream frosting so I just had to find a recipe for a good homemade chocolate cupcake. I found this recipe on http://www.stephanieskitchen.com/ Stephanie’s blog always has yummy treats so I knew I could trust her recipe. It did not disappoint. I also liked that these cupcakes had a different method that I had ever seen before. They were fun to make.

I did run into some issues when piping my frosting though- my fault entirely. I didn't have a big enough tip (I used a round 12 tip) and I found that pieces of Oreo would occasionally clog my tip. I definitely need to use a bigger tip next time. All things considering I think they turned out quite cute. My son was sick on Sunday so I had to miss out on family dinner. I was bummed that I didn't get to see everyone enjoy these.

Chocolate Cupcakes

1/2 cup shortening
1 cup sugar
1 egg
1 tsp. vanilla
1 tsp. baking soda
1/2 cup buttermilk
1 1/2 cup flour
1/2 cup cocoa
1/2 cup boiling water
Cream shortening and sugar. Add egg and vanilla and mix well. Dissolve baking soda in buttermilk and add to creamed mixture. Blend in flour. Blend cocoa and boiling water, to make a thick paste.
Combine chocolate mixture with creamed ingredients. Pour into cupcake papers that have been placed in muffin pan. Bake at 350 degrees for 12-14 minutes. Makes approximately 18 cupcakes.
Adapted from Cooks.com


Cookies & Cream Frosting
http://phemomenon.blogspot.com/
5 oz cream cheese, softened
4 Tablespoons unsalted butter, softened
3 cups powdered sugar
1 teaspoon vanilla
3 Tablespoons heavy cream
5 Oreo cookies, processed to crumbs

Beat the cream cheese and butter together until smooth and creamy. Add the powdered sugar, vanilla and cream and beat on low to incorporate. Once mixed together, turn speed to high and beat approximately 3 minutes until light and fluffy. Add the cookie crumbs on low and just mix in lightly. Pipe as desired and sprinkle with additional cookie crumbs if desired.


My Gabe gets so excited when I break out my hand mixer because he knows that his mum can't resist giving into him and letting him lick the beaters. I did it when I was a kid, it's fun to let my little guy do it now. He certainly approved if you can't tell by the look on his face.


Gooey Coconut Dream Bars

I made these on Sunday as a treat for my mother in law and two of my sisters in law. They were really easy to make and were very tasty. Neither my hubby nor I are HUGE fans of coconut but I still enjoyed a taste of one of these bars before I gave the rest away. If you are looking for a quick and easy treat for someone then these would be great- especially if they like coconut. Personally I am a sucker for anything with a graham cracker base.

Gooey Coconut Dream Bars
Source: Amy Scherber, of Manhattan bakery Amy's Bread, from The Sweeter Side of Amy's Bread


FOR THE CRUST
3 cups graham cracker crumbs (from about 20 crackers)
3/4 cup unsalted butter, melted
1/4 teaspoon coarse salt

FOR THE TOPPING
1 cup semisweet chocolate chips
2 cups sweetened flaked coconut
1 3/4 cups plus 2 tablespoons sweetened condensed milk

Directions
Preheat oven to 350 degrees with a rack in the center of oven. Butter a 9-by-13-inch baking pan and line with parchment paper; set aside.

To make the crust: In a medium bowl, mix together graham cracker crumbs, melted butter, and salt. Pour mixture into prepared pan and press into bottom of pan using your fingertips.

To make the topping: In another medium bowl, mix together chocolate chips and coconut; sprinkle evenly over crust.

Pour condensed milk evenly over coconut and chips, covering the entire surface. Transfer to oven and bake, rotating pan halfway through baking, making sure the milk does not get too brown or bubble over in the pan, 26 to 32 minutes.

Transfer baking pan to a wire rack to cool completely. Cut into 20 squares. Serve immediately, or wrap each bar tightly with plastic wrap and keep refrigerated until ready to serve.

Makes 20 bars

Saturday night homemade pizza

I had wanted to make homemade pizza for a few weeks. I had been scouting out recipes on various food blogs and finally decided upon this one from http://realmomkitchen.blogspot.com. I liked the fact that I didn't have to let the dough rise etc. This was fast and easy to make and really yummy. Surprisingly enough it was even good the next day heated up in the microwave for lunch.

My hubby and I have completely different taste when it comes to what we like on our pizza. So I made one for Brad and one for me (way too much pizza). For Brad I made good old Hawaiian and on mine I had white pizza sauce (recipe follows), red pizza sauce, mozzarella cheese, Canadian bacon and ricotta cheese. I would have been more creative but after a busy Saturday, I just opted for what was easiest.

The best part about this pizza was that my 18 month old liked it too. He won't eat pizza when we buy it from any pizzeria but he liked mine. I was quite tickled! Thanks baby Gabe!

Quick Pizza Crust

1 package of yeast
1 C warm water
1 tsp sugar
1 tsp salt
2 T oil
2 1/2 C flour
2 T cornmeal (optional for sprinkling on cookie sheet)

Dissolve yeast in warm water and add sugar. Let yeast sit about 10 minutes (you want it good and foamy). Stir in remaining ingredients until blended. Beat vigorously 20 strokes. (I did this all in my kitchen aid) Allow dough to rest 5 minutes in a bowl with saran wrap or a towel over it. Preheat oven to 425, spread dough onto a lightly greased baking sheet sprinkled with corn meal (optional). Top with desired toppings and bake for 20 minutes.


White Pizza Sauce
http://realmomkitchen.blogspot.com
1/2 cup ranch dressing
1 tsp. minced garlic
1 tsp. dried basil
1/4 cup shredded Parmesan

Mix all ingredients together and place on your pizza crust. This is enough sauce for 1 (14 inch) pizza

Fun at the park with Mummy.

One day last week after I picked Gabe up from Nana Sandy's house I took Gabe to the park. It was a beautiful day and I was just so excited that the sunshine was out that I couldn't resist. Gabe LOVES to be outside and begs all day to go out and play. Here are some cute pictures from our trip. Funnily enough Gabe was more interested in watching and feeding the ducks rather than playing on the playground.


Making friends- Gabe LOVES kids.

Friday, March 13, 2009

Chicken Parmesan

Chicken Parmesan was not supposed to be on the menu last night but when I got home and discovered I was out of rice, I had to improvise. You gotta love those days when pay day is approaching but not quite here yet and you notice that you are running out of EVERYTHING. I almost claimed defeat and sent the hubby out for take out but am proud to say that this time I persevered.

I'm not usually one to toot my own horn but this time I feel it is almost warranted. I know I know Chicken Parmesan is not rocket science but the fact that I put this together with no recipe and it tasted so good makes me proud.

I hadn't made chicken parmesan in so long. It seemed like every time I tried to make it, my bread crumbs would always fall off the chicken breast, burn in the bottom of the pan in the oven and typically I was left with a dried out chicken breast covered in semi-burnt marinara sauce...NOT yummy. What made the difference this time you say? It is all in the non-stick pan my friends. Believe it or not I had never and I mean never had a non-stick pan until this past November when my in-laws bought me a new set of pots and pans for my birthday and oh how I LOVE them. It is amazing how if you have the right tools you really can produce a better meal. Thanks Sandy! I will forever be indebted to you and that non-stick pan I love so much!

Nats Chicken Parmesan

3 thawed chicken breasts
1 egg beaten with a fork with a touch of milk to coat chicken breasts
about 2 cups of plain breadcrumbs
1 tsp of garlic salt
2 tsps of dried Italian herbs
dash of pepper
1/2 cup fresh grated parmesan cheese
your favorite marinara sauce (just enough to spoon on top of the chicken breasts)
1/2 cup of grated mozzarella cheese

Preheat oven to 350 degrees

First prepare the chicken breasts:
As I said above I was pretty much out of everything. So to tenderize my chicken breasts I actually placed them one at a time between two plastic supermarket bags and pounded on them with my rolling pin (this part was fun!)

Once the chicken is tenderized (oh and don't go too crazy with this, I got a little carried away with one of the breasts and kind of smashed it to oblivion- I should have taken a picture of it) dip the chicken in the egg and milk wash.

On a separate plate, mix the bread crumbs, garlic salt, Italian herbs, pepper and about 1/4 of a cup of the parmesan cheese. Coat the chicken in the bread crumb mix and fry in a non-stick (this is essential) fry pan/skillet until golden on each side- I used olive oil to fry them in. I also cooked them one at a time. One thing I have learnt when frying anything covered in bread crumbs is not to mess with it once you put it in the pan. Don't turn the chicken breast until the side down is sufficiently cooked. This helps seal the breadcrumbs and helps eliminate them falling off etc.

Once all the chicken breasts are cooked place in an oiled glass dish. I used a 9x13 pan and brushed the bottom with a little olive oil. Place chicken breasts in the oven for 20 minutes. When the 20 minutes is up, spoon enough marinara sauce onto each chicken breast so that they are covered and sprinkle with remaining parmesan and mozzarella cheese. Place back in the oven for approximately 10 minutes to allow for sauce to heat through and cheese to melt. Serve over pasta.

ENJOY!

Thursday, March 12, 2009

Z-Gallerie. Stuff I would love to have- Just dreaming

I work a little less than a mile from The Gateway in Salt Lake City, Utah. For those of you who don't know what The Gateway is, it is an outside mall that has quite a few cool stores. Some of my favorite stores at The Gateway are Anthropologie, Forever21, Jcrew, Banana Republic and Z-Gallerie. I often walk down to The Gateway on my lunch break for something to do. I enjoy the walk and love to peruse my favorite stores and dream of how I would decorate my house if only I could afford it. Maybe someday =)

Today I spent most of my time in Z-Gallerie. They have lots of cool things I would love to have in my home. I seem to have a thing for pretty plates that are different and today I found some really neat ones.

The photos really don't do these justice. I absolutely LOVE a pretty dinner table with layered plates and cool table linens. In the store they had some of the below items matched so wonderfully with table linen I could have just stared at them all day.


I love these plates- when I was looking at the smaller size I thought it would be so cool to somehow use them on a wall. If you put a few of them together it could make for a really interesting wall piece.